One of the modern-day advancements is the power bank, which people carry around their move. People need power bank to charge their electronic devices. They exist in several varieties ranging from slim, pocket-sized devices to larger, higher-capacity ones, used to charge one’s smartphone or tablet. However, the issue arises when these power banks stop charging the devices, and the sole hope for one’s convenience to travel is crushed. This also happens recently happens to a friend of mine, who gave me his dead power bank as he no longer was using it. Thus, the main concern arises of how to repair a dead power bank. This instruct able will be a guide on how to repair a power banks with certain repairs and replacements.
Repair and replacements
First of all, one needs to check if the power bank is only not charging the phone or if it is doing this with every other device. If this is the case then one surely needs to replace the power bank as they are merely batteries or a group of batteries that die after a certain amount of charging cycles.
Thus, until and unless one is a good electric repair, it is advisable to replace it. However, one can also repair their power banks as in the above-mentioned case. When I looked at the batteries of my friend’s power bank, the batteries inside the power bank were corroded, so I tried to give them a new life. For this, I am going to share a few interesting tips on how to repair power banks and remove such corrosions, even possible with homemade solutions, readily available in our kitchen.
Read Also: How to Reset Power Bank
Brief Introduction about Power Banks
Before moving towards sharing some tips, it is wise enough to know about power banks. These portable power banks consist of a special battery inside a special case, with a special circuit to control the flow of power. It has three main parts of Lithium polymer rechargeable battery, a DC-to-DC converter module based on pulse frequency modulation technology, and a battery charger module.
The electrical energy is stored in the power bank, which later is used to charge up the device. Power banks are life-saving inventions as these devices are outstripped by the amount of time one uses them. Thus, power banks act as battery backups. They are good for any cameras, MP3 Players, smartphones, GPS systems, tablets, etc- particularly anything thing that can be charged by USB; thus, can be charged from a power bank.
Hence, there is a dire need for power banks these days, and if there is any technical fault, then they need repair. The following steps deal with the much-asked question of how to repair a power bank.
What are the Steps to Repair a Power Bank?
Following are the steps taken to repair the power bank:
1. Disassemble the Power Bank:
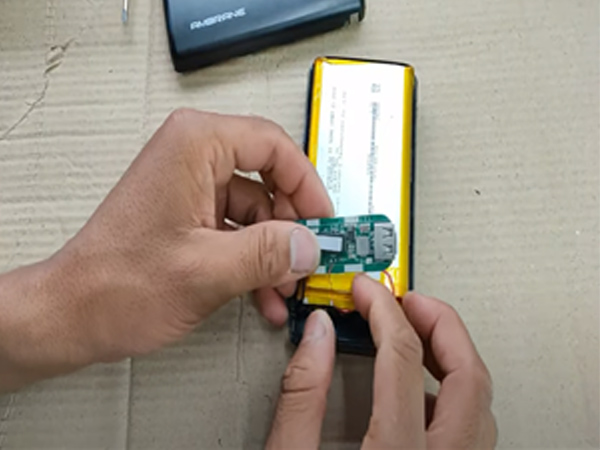
Firstly, one needs to disassemble the power bank diligently. A lit bit of force is required while focusing so that it does not break the board inside. One needs to take safety precautions during this process.
2. Looking for a technical fault:
In my case, I found corrosion or rust over my Li-ion battery. To remove this, use white vinegar and rub over the corroded or rusted surface. This will lead to cleaner contact surfaces and then solder all batteries together.
Read Also: How to Repair a Power bank
In case of not have white vinegar, follow the givens steps:
Firstly, one needs to take off the batteries, then get 2 containers for each solution. Then, get 1 spoon of raw salt and put it in one of the containers, and the rest is filled with vinegar. Stir them together. Only that amount of salt is added to vinegar which will dissolve.
Furthermore, sodium bicarbonate is added to the other container, and the rest is filled with water. More baking soda is added to make it cloudy. The amount is as long as the alkaline cancels the acid of the vinegar. Now, take the cotton ball or any piece of cloth to rub over the battery terminal.
After 2 minutes of applying vinegar solution, the terminal looks shiny. The acid and salt both have etched away the oxides, resulting in shiny metal. If not then leave for more time. Thus, the shiny terminals of the battery are ready to get soldered.
3. Repairment Plan and its first charging
Now, check the Charging PCB with a multimeter to know whether the output voltage is desirable or not. The output voltage which I am getting is 4.1 volt, which is enough for li-ion battery charging. Then, solder the batteries. Unfortunately, out of my 4 batteries, 1 is dead, so I soldered 3 batteries, which reduced the power capacity.
4. Calculation Process:
If one has to consider the overall capacity of the bank then before that capacity of the individual battery should be determined.
Formula: Capacity of one battery = Total capacity of power bank/ No. of cells
=10400/4
=2600mAh OR 2.6 Ah
*mAh stands for milli ampere hours
New capacity of the power bank= Capacity of one cell * No. of cells working cell left
=2600*3
=7800mAh OR 7.8 Ah
Hence, the power bank capacity is reduced from 10400mAh to 7800mAh.
5. Pack and Test:
Now, it’s time for the final steps. For this, pack the power bank once again with its necessary parts and installed batteries. Check whether the power bank is working or not. Resultantly, a new life is given to the power bank with a capacity of 7800mAh.
Read Also: Can a10,000mAh power bank charge a laptop
How to repair a power bank at home?
Below are the steps of how a person can repair a power bank at home:
Step 1: Start with removing the upper case of the power bank. To provide extra leverage, if necessary, use a screwdriver.
Step 2: Remove chassis
Step 3: Check the battery and desolder +ve and -ve terminal of the battery from the charger board circuit.
Step 4: Next is to connect an AVO meter to the +ve and -ve terminals of the battery to check its battery voltage. If it is less than 3.6V, then the battery is damaged due to undercharge or overcharge. Thus, the battery needs replacement.
Step 5: The problem can also lie in the charger circuit board if the battery seems to be in a good condition. Replace short resistors, capacitors, or ICs on the board, if any. Moreover, replace the charger circuit board, if the problem persists.
Step 6: For replacing the charger circuit board, one has to remove the circuit board from the power bank and then install a new one of the same rating.
Step 7: Solder +ve terminal of the battery with -ve of the charger board, and +ve of the battery with +ve of the charger board.
Step 8: Finally, close the body of the power bank, switch it on and test the device.
Repairment Procedure of the Power bank:
There are two issues when it comes to troubleshooting procedures:
One is the faulty battery. The battery will not hold a charge for a longer period if is over or undercharged. In this case, permanent battery damage is likely to be the cause, which requires battery replacement.
Other is the faulty charger circuit board. When it comes to the overcharge of the battery, it is possible that any discrete component such as a resistor, ICs, or capacitor has shorted. It needs replacement. However, if a bus or trace has shorted, then either en route the trace using a CNC machine or replace the charger circuit board.
Read Also: Power Bank for Laptops
Tips and Precautions for How to Repair a Power Bank
- To open a power bank, use a screwdriver.
- Do not touch the PCB traces and discrete components with bare hands as the static charges can lead to shorting of the terminal. Instead, use tweezers.
- The battery and the charger board terminals need to be soldered correctly before turning on the power bank.
Common Problems In Power Banks And Their Solutions
The common problems of how to repair a power bank with a broken indicator and no charging issue.
How to Repair a Power Bank with a Broken Indicator
The question here is how to repair a power bank with a broken indicator. For this one need to see if the indicator is not functioning, then the charger circuit or voltage converter might be defective or the batteries are not charging.
Therefore, ensure that the charging function is still working and only the indicator has failed. It is not advisable to open the case, and repair batteries or circuits for the users unless one has electronic knowledge.
Apply a USB meter to know if the power bank is charged or empty. One needs to charge the power bank by connecting it to the charger through the USB meter. If the capacity has stopped increasing then the power bank is charged.
This is a good way to check if the capacity has decreased and also to verify that the power bank has the capacity that it claims.
How to repair a Power Bank which is not charging
If the power bank is composed of Li-Ion 1860 batteries, and it is not charging, then it is likely that the charging circuit is broken, but the batteries are useable, which one can use to DIY a power bank. However, if all the batteries are dead then it’s advisable to buy a new one, as the printed circuit board is something that is not easy to fix.
How to repair a power bank when it’s blinking, not charging
Mostly, power banks have four indicator lights 1st, with 0%-25% charging state, 2nd with 25%-50%, 3rd with 50%-75%, and 4th with 75%-100% charging state. When there is the 4th steady indicator light, it means the power bank is fully charged.
When there is only 1 indicator blink, it is better to disconnect your power bank from any device, as discharging it to empty will degenerate the battery.
Sometimes, the power bank has no power but the indicator light is blinking even after several hours. It has several reasons and also several solutions are available.
Power Cable Issue:
- It can be the cable issue. For this, one sees that whether the socket fits right or if is there any debris inside.
- Additionally, the cable can also be unable to support charging, as cheap cables do not support fast charging, which is required by the power banks.
Charger Adaptor Issue:
- Sometimes, the adaptor is out of work and the charging value is low. It needs a replacement of charger.
Power Bank Issue:
- The power bank can also have an internal failure due to hard shock or being placed in a hot environment.
- Moreover, the battery life is usually done if used for 300-1000 power cycles.
Power Source Issue:
- The charging current of the computer is 0.5A, so try the wall socket to charge the power bank.
How to Repair dead Power Bank
If everything else is fine with the power bank, then try the following steps:
- One needs to check the warranty and call the supplier for the solution within that warranty period.
- If it is out of warranty, then better go to a local electrical repair shop.
- No other solution after the above-mentioned steps. Just dispose of the power bank.
FAQs
Can power banks be repaired?
The answer is yes, they can be repaired if it is still under warranty. If the manufacturer of your power bank claims that it has been used reasonably and is still in the warranty time, then one can repair, refurbish, or even replace their power banks.
If power banks are not in use, do they lose charge?
Power banks will lose charge, Power bank’s quality will play a vital role in this regard. Power banks will might lose charge but its rare. A power bank that is high quality can keep the charge for several months without any losses, however, a small one can start losing within a few weeks.
Why do power banks stop working?
If someone has a power bank for two or three years, then probably the battery is worn out. It can also be cable or socket issues. Moreover, if one has trouble charging the power bank, the problem may lie in the included micro-USB cable. Thus, try another cable or one can check the cable by charging some other product. Additionally, use a functioning adapter to check.
What are the steps to take, when the power bank is not charging?
This problem can be due to included micro-USM cable. So, for this try another cable to charge the power bank. One can also check the cable by trying any other product with it while using the correct outlet. Moreover, use a working adaptor for checking purposes.
What are tips to extend the power bank’s life?
- One needs to consider temperature as the power bank should not be charged under 5 degrees and discharged over 40 degrees.
- Disconnect the power bank from its charger when fully charged.
- One should charge power banks, thrice each month to keep them in good working condition.
- No need to fully charge the power bank. Charge it up to 80% and discharge it up to 20%.
- Try not to drop the power bank as it has fragile components inside.
- Make sure to prevent the exposure of the power bank to extreme temperatures.
- Avoid keeping the power bank away from other object metals.
- Make sure not to charge the power bank and device at the same time.
CONCLUSION
How to repair a power bank is no longer a mystery and anyone can get the basics of one’s issue, which will make one take the desired steps. I hope the above-mentioned steps and guide would prove to be helpful in maintaining a healthy power bank and repairing it whenever any technical issue arises. Thus, this article is an extensive study on how to repair a power bank, which will aid the reader in identifying the issue and then taking necessary steps for it.


